This article provides a step-by-step instruction on how to setup robot framework on your local machine. This is intended for Windows user. But if you are not using Windows, you can still use this as a guide.
What we will do:
- Download and Install an Integrated Development Environment (IDE).
- Download and Install Python.
- Download and Install the commonly used Robot Framework Libraries.
- Install an IDE Plugin for Robot Framework.
- Create a sample script to verify that the setup is working well.
Download and Install an Integrated Development Environment (IDE).
For our setup, we will be using PyCharm as our IDE. To download and install, follow the steps below:
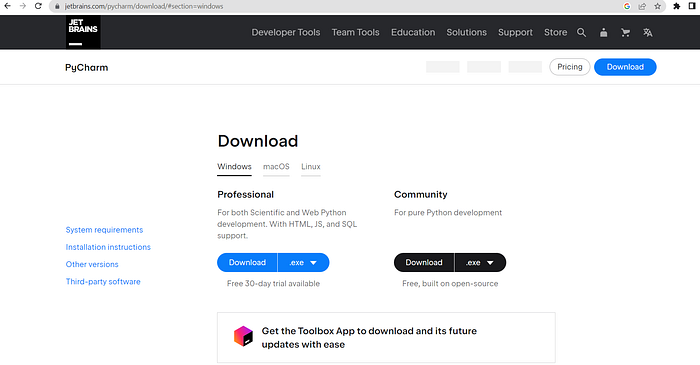
- Visit the official download page of PyCharm. (Link)
2. Download the community version. You can try the professional version if you want, but the community version is good enough for test automation.
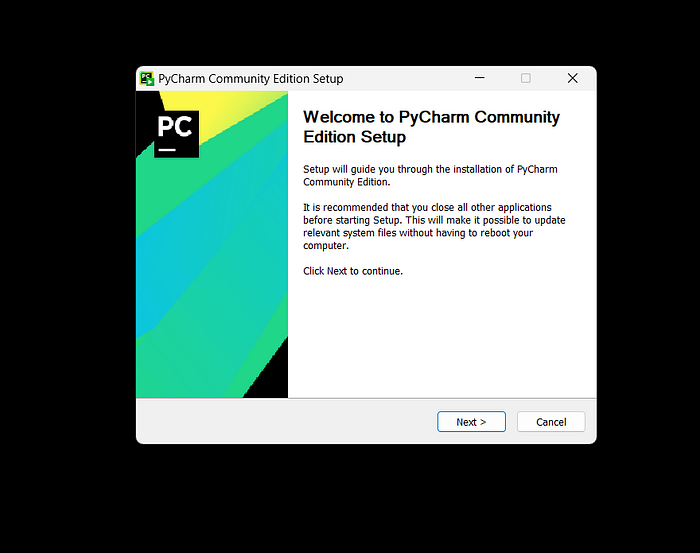
3. Run the downloaded executable file. Follow the installation instruction prompted by the Pycharm Community Edition Setup modal.
4. Once installed, you should be able to search PyCharm in the Start menu (Press Windows key to open).
Download and Install Python
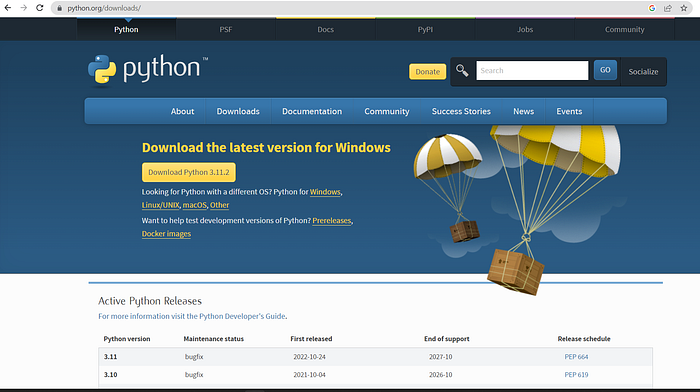
- Visit the official download page of python. (Link)
2. Download the latest version for Windows.
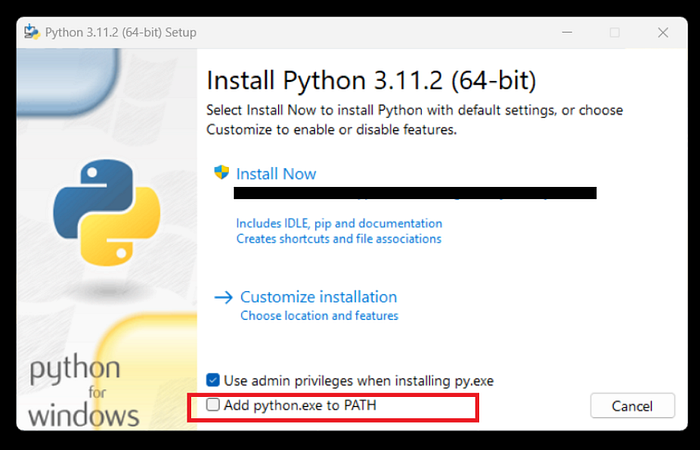
3. Run the downloaded executable file. The Python setup modal should appear. Tick the Add python.exe to PATH to automatically include python to PATH.
4. Click Install Now and follow the instructions prompted by python setup modal. Python will usually be installed in C:\Users\<Username>\AppData\Local\Programs\Python\<Python Version>. In case you forgot to tick the Add python.exe to PATH, be sure to manually add this to your environment variable PATH.
To add python to PATH, perform the following steps:
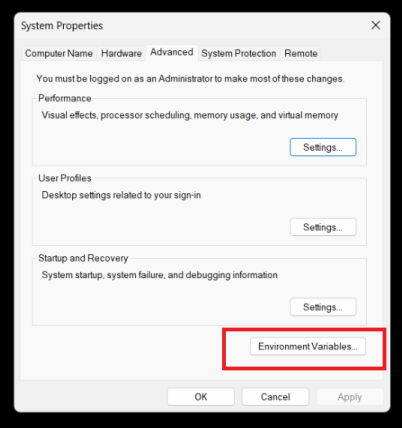
4.1. Open System Properties. To open, you can directly search Edit the system environment variables in the Start menu.
4.2. In the System Properties, open Environment Variables.
4.3 In the Environment Variables Modal, you can either add Python in PATH under User Variables or System Variables. If you add it under User Variables, it will be accessible only for that specific user. If you add it under System Variables, it will be accessible by all the users. Personally, I prefer adding it on System Variables so it will be a one time setup but you can place it wherever you like.
4.4 Be sure to add the Python folder and the script folder inside it in PATH. See example below. If in any case, python is in a different directory, be sure to locate it correctly and add that directory in PATH.
C:\Users\<username>\AppData\Local\Programs\Python\<Python Version>\
C:\Users\<username>\AppData\Local\Programs\Python\<Python Version>\Scripts\
5. Once Python is downloaded, installed and the needed directories were added to PATH. You can open Command Prompt (cmd) to check if Python was installed properly. In cmd, run:
python --version
You should see the version of the installed Python.
Download and Install the commonly used Robot Framework Libraries.
We will be installing the following:
- robotframework. This is the core of the framework.
- robotframework-seleniumlibrary. This is for Web testing.
- robotframework-requests. This is for API testing.
- robotframework-appiumlibrary. This is for Mobile Testing.
- robotframework-pabot. This is for running tests in parallel.
- robotframework-autoitlibrary This is for Desktop Automation
When it comes to setting up you workstation for test automation, you have two options, install the dependencies globally or install the dependencies in a virtual environment specific to your project. I prefer installing it in a virtual environment to avoid complications in case you are working on multiple projects and for portability reasons as well. Before that, we will need to create a virtual environment first.
We will create a virtual environment in the context that you are starting your project fresh.
- Open PyCharm.
2. Select New Project.
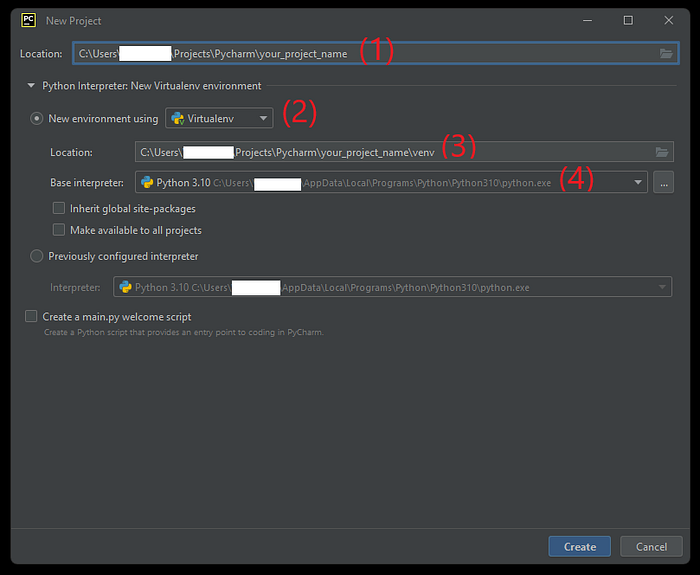
3. In the New Project modal.
(1) The last in the path is your project name. Be sure to use a good project name.
(2) Make sure that the New environment using radio button is selected and Virtualenv is also selected. Though you can select others like pipenv, poetry or conda, we will use Virtualenv.
(3) This is the location of the virtual environment to be created. By default it is inside the project location. Just leave the default configuration.
(4) This is the location of the python interpreter. Just leave the default unless you want to use a different interpreter.
4. Once all the configuration is set, proceed on creating the project. Just click Create.
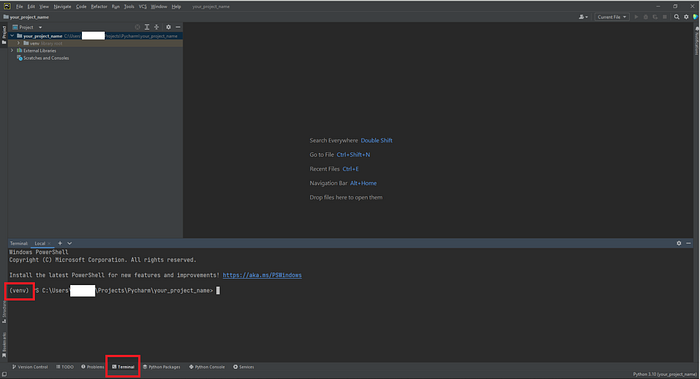
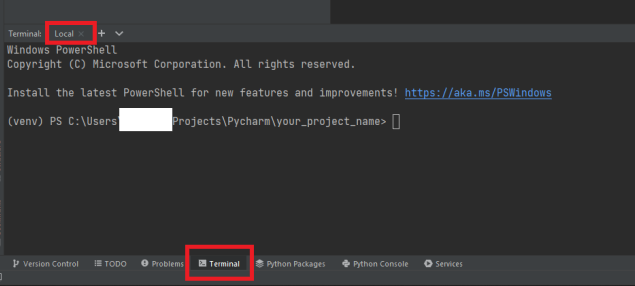
Upon creation, the virtual environment should be automatically activated. To check, open Terminal (located at the bottom part of your IDE). In the Terminal, you should see (venv) preceding your current working directory.
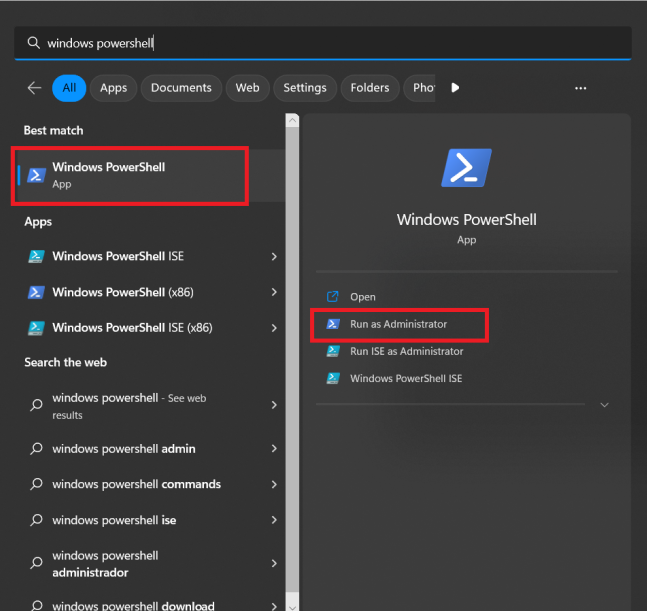
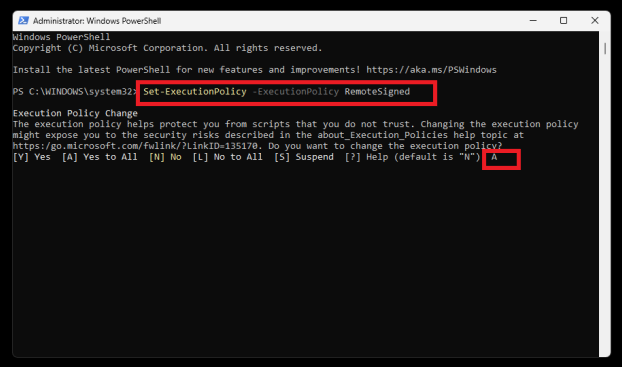
If it was not automatically activated, most likely it was due to the execution policy setting of your windows device. To configure your execution policy, open Windows Powershell in administrator mode.
In Windows Powershell, run the command below and select Yes to all.
Set-ExecutionPolicy -ExecutionPolicy RemoteSigned
Once the command is successfully executed, go back to PyCharm IDE.
Close the terminal and re-open it. Be sure close the terminal by clicking on the close button ( x ) not hide and unhide it.
If you still don't see (venv), you have to execute any of the commands below, whichever is applicable in your case. For more details on python virtual environment, check this link.
venv\Scripts\activate.bat
venv\Scripts\Activate.ps1
Now that we've created our project, created a virtual environment and successfully activated it. All we have to do is to install the libraries using pip, a package installer for python.
Run the pip commands below one by one to install the libraries.
pip install robotframework pip install robotframework-seleniumlibrary pip install robotframework-requests pip install robotframework-appiumlibrary pip install robotframework-pabot pip install robotframework-autoitlibrary
Assuming that you did not encounter any unexpected error while installing, your workstation is now ready to be used in your automation project.
One good practice is to save the project dependencies in a requirements.txt file. To do that, just run
pip freeze > requirements.txt
If while working on the project, you decided to add more libraries, you can re-run the same command to save the newly added libraries. If you decide to setup the same project on a different machine, you can install the same dependencies saved in the requirements.txt file. Just run
pip install -r requirements.txt
Install an IDE Plugin for Robot Framework.
Without a plugin, you would be like writing a robot script using pen and paper. With a plugin, you get code suggestions, code completion, code highlighting and many more depending on the plugin you use.
There are a few robot framework plugins available for PyCharm. IntelliBot #patched, Hyper RobotFramework Support, Robot Framework Language Server and a few more. Each has their own issues but out of the three, I have the best experience so far with the Robot Framework Language Server plugin, so we will use this. You are free to try other plugins.
To install, follow the steps below.
- Open PyCharm.
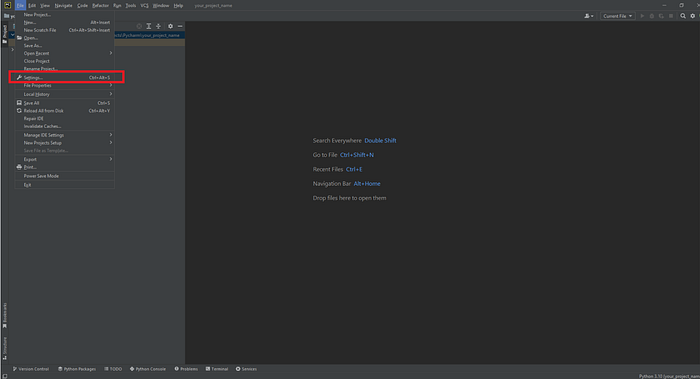
- Open File > Settings or Ctrl+Alt+S
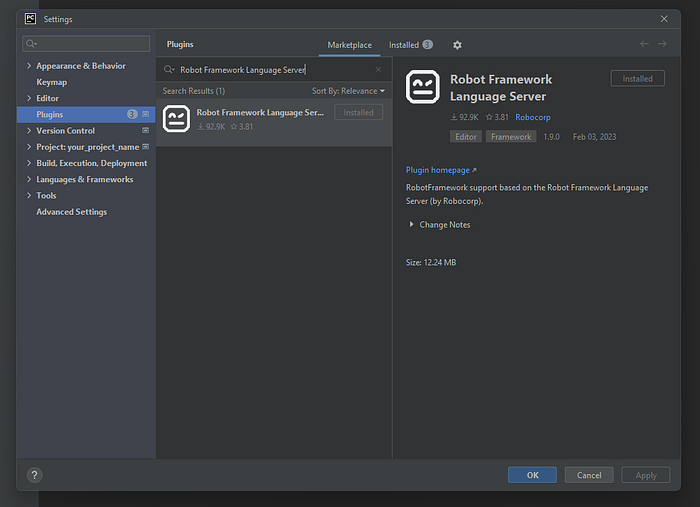
3. Go to Plugins > Marketplace. And search for Robot Framework Language Server.
4. Install and Restart your IDE.
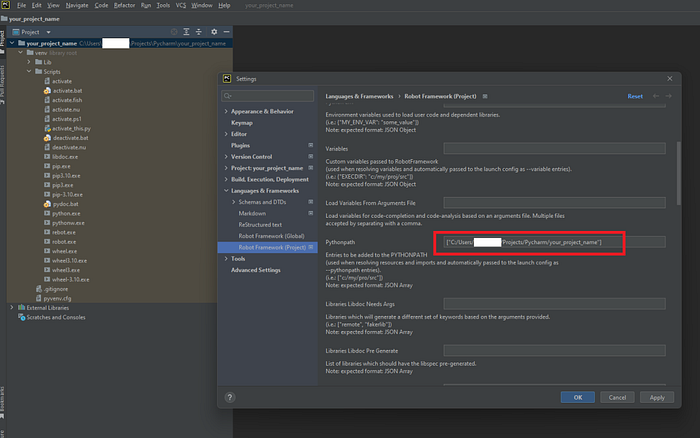
5. To configure the plugin, go to File > Settings > Language & Frameworks > Robot Framework (Project). We will configure the plugin at a project level. I prefer it this way because on other projects we may have a different configuration.
6. A lot of configuration options are available but we only need to fill out two fields. The Language Server Python and the Pythonpath. Depending on your needs, you may also fill out the other fields.
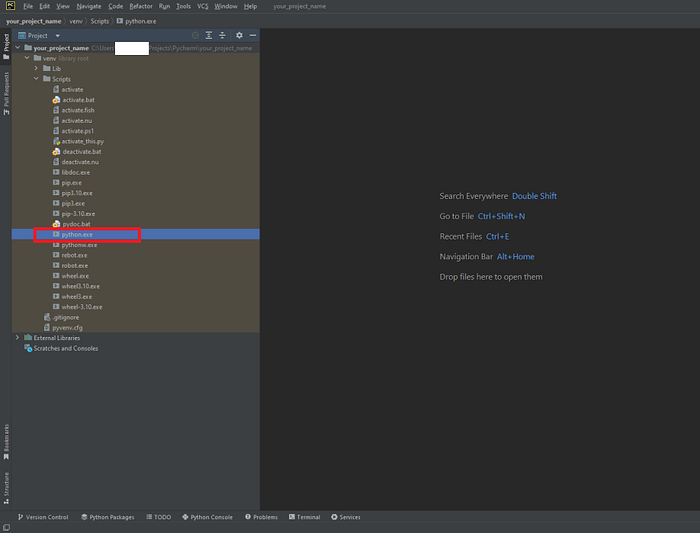
7. In the Language Server Python field, fill this with the location of the python interpreter we want to use. In our case, we will use the interpreter inside our virtual environment.
Get the path of the python.exe and place it in Language Server Python field. Be sure to apply the changes before closing the Settings.
8. For the Pythonpath, fill this out with the path of your project. Be sure to apply the changes before closing the Settings.
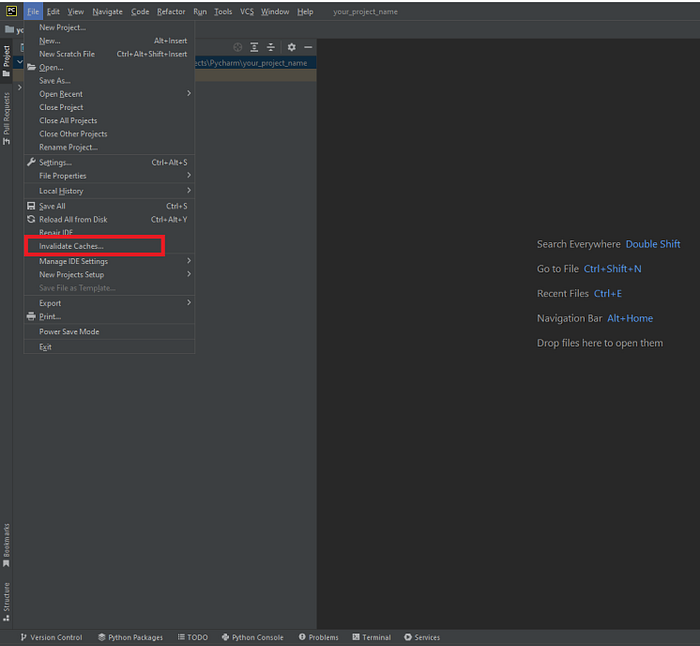
Additional Note: When you are working on your scripts, the plugin may flag some errors (codes are underlined in red). This may be due to errors in you scripts but sometimes you may get these flags even if you scripts are running perfectly fine. This may be due to some caching issues. To resolve this, try File > Invalidate Caches… > Invalidate and Restart.
Create a sample script to verify that the setup is working well.
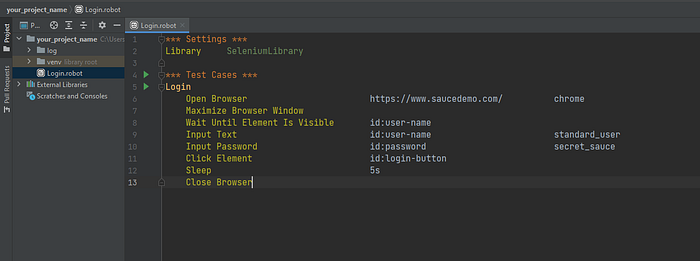
In this simple script, we will only utilize the robotframework-seleniumlibrary we installed earlier. We will write a simple script to login to Swag Labs , a demo website.
- Create a robot file. E.g. Login.robot
2. Paste the code below
*** Settings ***
Library     SeleniumLibrary

*** Test Cases ***
Login
    Open Browser                        https://www.saucedemo.com/          chrome
    Maximize Browser Window
    Wait Until Element Is Visible       id:user-name
    Input Text                          id:user-name                        standard_user
    Input Password                      id:password                         secret_sauce
    Click Element                       id:login-button
    Sleep                               5s
    Close Browser
3. Run the sample script by clicking on any of the play button available. A convenient feature of the Robot Framework Language Server is the Play button that allows you to run a single test or the entire test suite without typing any commands in the terminal.
At this point, the script should run fine without any errors. If there are errors, please revisit the previous steps. If the issue persists, Google or ChatGPT is your friend.
Your workstation is now ready for you to write and run robot scripts. To know more about robot framework, you can visit their website or head straight to their user guide. Good luck!


No comments:
Post a Comment