A README file is an essential guide that gives other developers a detailed description of your GitHub project.
You may be wondering, Why anyone should spend time writing a README file. Well, here are some reasons to help convince you that it's a good idea:
Contents of Readme File:
The following are the general key components of a Readme file:
- Include Your Project's Title: This is the name of the project. It describes the whole project in few words and helps people understand the primary goal and aim.
- Write a Description: Your description is an essential part of your project. A well-maintained description allows you to show off your work to other developers as well as potential employers.
- How to Use Your Project: Provide instructions and examples so that users or contributors can use the project. This will make it easy for them so that if they encounter a problem, they will always have a place of reference.
- Include Credits: If you have worked on the project as a team, list your team members. You should also include their GitHub profiles.
You can also add the following details in the Readme file:
- What was your motivation? Why did you build this project?
- What problem does the project solve? Or, what it does?
- Why you used specific technologies? If your project has a lot of many features, list them here.
- Mention some of the challenges you faced and features you hope to implement in the future.
- Mention anything that you think you are proud of building or having in that project
- What did you learn in the process?
- What's next for the project?
- Mention languages, frameworks, databases, etc.
- Provide deploy links or any other required links
Before diving deep into our project's readme, let's discuss markdown language.
Markdown
- Markdown is a lightweight markup language that allows us to style a digital text document using typical formatting techniques like headings, emphasis, lists, images, and links.
- Markdown files have extensions .md or .markdown. We can convert Markdown into XHTML or HTML to display nicely in a browser.
- Some of the many uses of Markdown are:
- readme files
- Writing messages in online discussion forums
- Creating rich text using a plain text editor, emails, and technical documentation.
- Popular sites that use Markdown include GitHub, Trello, Reddit, SourceForge, and StackExchange.
- Markdown parsers also support dropping in blocks of HTML code that add to Markdown's limited syntax if you want to achieve a more complex design.
Why should we use Markdown?
- Easier for non-tech writers to produce documentation that can be both collaborative and flexible.
- Easy to pick up – It has a base of email formatting conventions that most of us are exposed to already.
- Easily readable (in its raw state), unlike HTML, which is full of tags.
- Platform-independent – which means you can create Markdown files in any text editor.
- Reusable skill: It's versatile, and we can use it to take notes, create content for a website, or produce print-ready documents.
Now, let's discuss elements of markdown language.
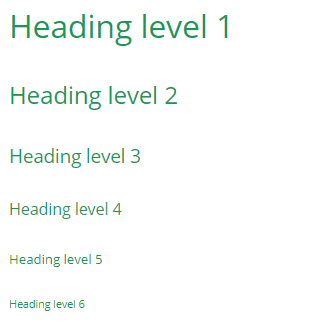
1. Headings:
- Headings make your text more readable and help to break up the topics.
- In Markdown, headings are formatted with hashes (#) in front of the line containing your heading.
- You can use up to six hashes, with the number of hashes corresponding to a heading level.
Syntax:
# Heading level 1 ## Heading level 2 ### Heading level 3 #### Heading level 4 ##### Heading level 5 ###### Heading level 6
Formatted text:
2. Paragraphs:
- To split your information up into paragraphs (with a noticeable gap between each paragraph).
- Paragraphs are divided by a blank line (a line containing no characters) between consecutive paragraphs.
Syntax:
Paragraph 1 Paragraph 2
3. Line breaks:
- To split your information up by inserting a new line with less space than you'd get from formatting as a paragraph. It is called a line break.
- To insert a line break into your Markdown file, finish your line with at least two spaces and press return. It will render a new line for your text.
Syntax:
Line 1 Line 2
4. Italics:
- Wrap the item with one star/underscore on each side.
Example:
*one star on each side* _This text is also italic_
Formatted text:
one star on each side This text is also italic
5. Bold:
- Wrap the item with two stars/underscores on each side.
Example:
**two stars on each side** __This text is also bold__
Formatted text:
two stars on each side This text is also bold
6. Simultaneously Bold and Italic:
- Make your text Simultaneously bold and italic to give it even more weight!
- Use three asterisks (or three underscores) to wrap your word or phrase.
Example:
***This text is italic and bold.*** ___This text is also italic and bold.___
Formatted text:
This text is italic and bold. This text is also italic and bold.
7. Striking through:
- Wrap the item in two tildes on each side.
Example:
~~strikethrough~~
Formatted text:
8. Links:
- To link to external websites in Markdown content use two sets of brackets.
- Wrap link text in brackets [ ], and then wrap the URL in parentheses ( ): [ ]( ).
Example:
[This text links to gfg](https://learn2pro.com/).
Formatted text:
This text links to web url
9. Images:
- Inserting an image into your Markdown file is similar to the formatting for links.
- Begin your image formatting with an exclamation mark. Next, use square brackets to wrap your image alt text, next to parentheses containing the URL for your image.
- Ensure there are no spaces between the exclamation mark, square brackets, or parentheses.
- When your Markdown file renders to HTML, it will embed the image directly into the body text.
10. Unordered lists:
- Markdown allows you to format your lists with several different symbols: asterisks (*), hyphens (-), or plus signs (+).
- It's up to you to choose which symbol you prefer. The result you get is the same.
Syntax:
-Just add a dash first and then write a text. -If you add another dash in the following line, you will have another item in the list. - If you add four spaces or use a tab key, you will create an indented list. - If you need sert an indenta list within an intended one, just press a tab key again. Sometimes you want bullet points: *Start a line with a star *Profit!
Output:
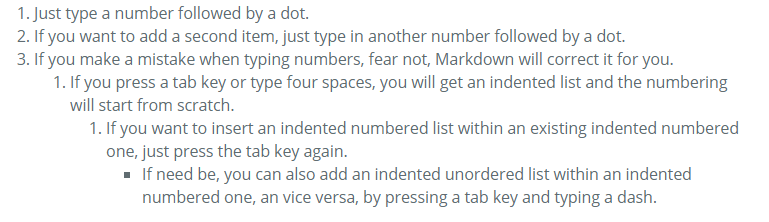
11. Ordered lists:
- Format your ordered lists by preceding each list item with a number, followed by a full stop and then a space.
- In Markdown, it doesn't matter which numbers you use to format your list, as the list will always render as 1, 2, 3, and so on.
Example:
1. Just type a number follow by a dot. 2. If you want to add a second item, just type in another number followed by a dot. 1. If you make a mistake when typing numbers, fear not, Markdown will correct for you. 1. If you press a tab key or type four spaces, you will get an indented list and the numbering will start from scratch. 1. If you want to insert an indented numbered list within an existing indented numbered one, just press the tab key again. -If need be, you can also add an indented unordered list within an indented numbered one, by pressing a tab key and typing adash.
Formatted text:
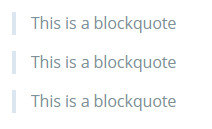
12. Blockquotes:
- Sometimes in Markdown, we will want to reference an external source using quotation marks. It is called a blockquote.
- You represent any blockquote by preceding the first line of the block quote with a greater-than sign or angle bracket (>).
Example:
> This is a blockquote > This is a blockquote > This is a blockquote
Formatted text:
13. Horizontal rules:
- A horizontal rule is a tiny functional element that you can use to visually split up blocks of text within your Markdown file.
- We represent a horizontal rule by three or more hyphens (-), asterisks (*), or underscores (_).
Example:
--- * * * ___
Formatted text:
14. Code snippets:
- To reference snippets of code as examples, format code snippets using backticks ` that wrap your code snippet.
- The first backtick "opens" the snippet, and the second backtick "closes" it.
Example:
`This is a code snippet.`
Formatted text:
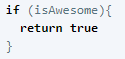
15. Code blocks:
- Formatting code blocks is useful when you have a bigger chunk of code to include in your Markdown file.
- Format your code blocks by indenting every line of your code block using one tab or four spaces.
- And if you'd like to use syntax highlighting, including the language.
Example:
```javascript if (isAwesome){ return true } ``` Formatted text:
16. Escaping:
- In Markdown, you will often need to include characters in your text (for example, an asterisk) that may be part of the Markdown syntax.
- You need to "escape" these characters, so your Markdown application doesn't read these characters as formatting.
- You escape characters in Markdown using a backslash before the character, with no space in between.
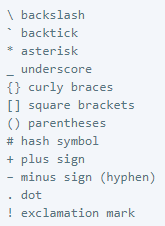
Syntax:
\ backslash ` backtick * asterisk _ underscore {} curly braces [] square brackets () parentheses # hash symbol + plus sign – minus sign (hyphen) . dot ! exclamation mark Formatted text:
17. Lists within a blockquote:
- Nest your list formatting inside your blockquote formatting.
- Format your blockquote using a greater-than sign (>) followed by a space, including a sign before every line of your blockquote.
- Add your list formatting (*) just after your greater-than signs.
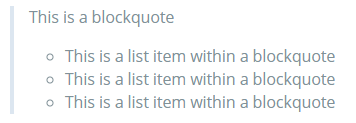
Example:
> This is a blockquote > * This is a list item within a blockquote > * This is a list item within a blockquote > * This is a list item within a blockquote
Formatted text:
18. Quotes:
- Add a quotation with the > character at the beginning of each line.
Example:
> "I make Jessica Simpson look like a rock scientist." > —Tara Reid, actress
Formatted text:
Since we are discussing readme.md, which is present in GitHub repositories, let's discuss GitHub Flavored Markdown!
GitHub Flavored Markdown
- GitHub.com uses its version of the Markdown syntax that provides an additional set of useful features, many of which make it easier to work with content on GitHub.com.
- Note that some features of GitHub Flavored Markdown are only available in the descriptions and comments of Issues and Pull Requests.
- These include @mentions as well as references to Issues and Pull Requests.
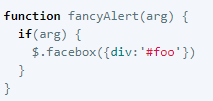
1. Syntax highlighting:
Example:
Formatted code:
2. Task Lists:
- To create a task list
- If you include a task list in the first comment of an Issue, you will get a handy progress indicator in your issue list.
- It also works in Pull Requests.
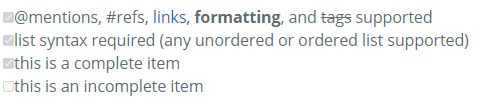
Example:
- [x] @mentions, #refs, [links](), **formatting**, and <del>tags</del> supported - [x] list syntax required (any unordered or ordered list supported) - [x] this is a complete item - [ ] this is an incomplete item
Formatted text:
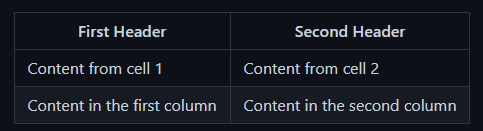
3. Tables:
- You can create tables by assembling a list of words and dividing them with hyphens – (for the first row), and then separating each column with a pipe (|).
Example:
First Header | Second Header ------------ | ------------- Content from cell 1 | Content from cell 2 Content in the first column | content in the second column
Formatted text:
4. Username @mentions:
- Typing an @ symbol, followed by a username, will notify that person to come and view the comment.
- This is called an "@mention" because you're mentioning the individual.
- You can also @mention teams within an organization.
5. Automatic linking for URLs :
6. Mathematical expressions :
- You can also add math formula or equation with markdown.
Syntax:
$$<<mathematical expression>>$$
Example:
$$\sqrt{3}+1$$ Output:
√3+1
Since now you know everything about readme.md, the next time you make a repository don't forget to add a perfect readme to your project!


No comments:
Post a Comment